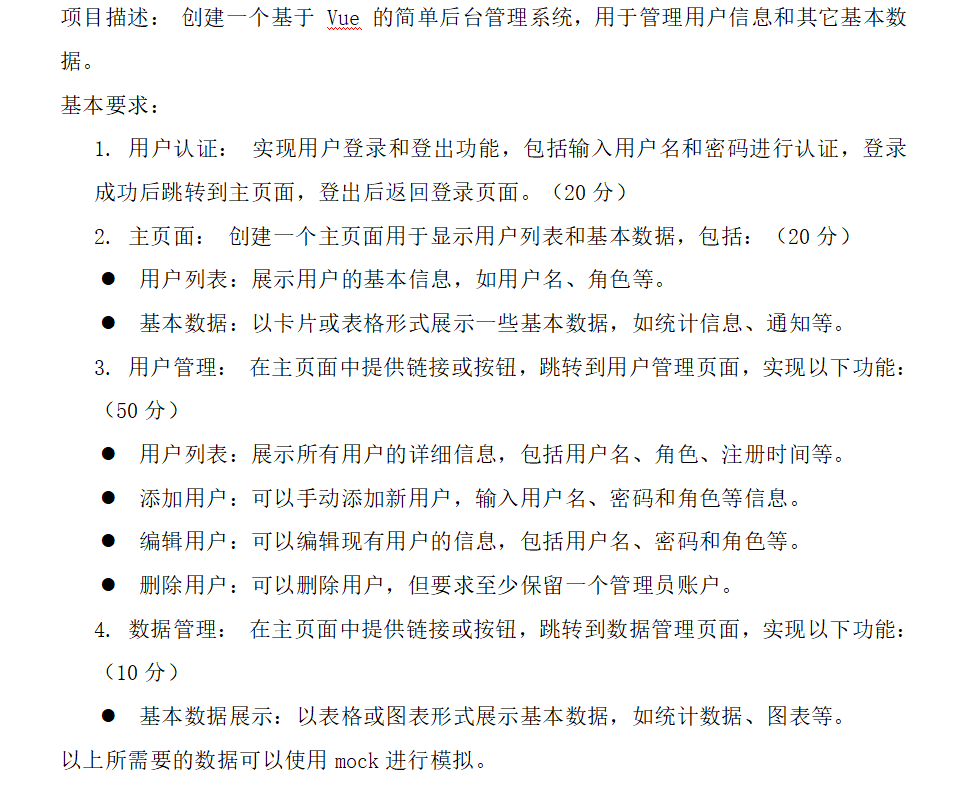
Appearance
vue3用户管理系统
时间预计:30分钟
技术: vue3 echart elementplus 数据来源: mock.js进行数据模拟 作业要求:

项目启动方式
解压代码 打开命令行 到代码解压目录
shell
npm i
下载依赖完成后启动项目
shell
npm run dev
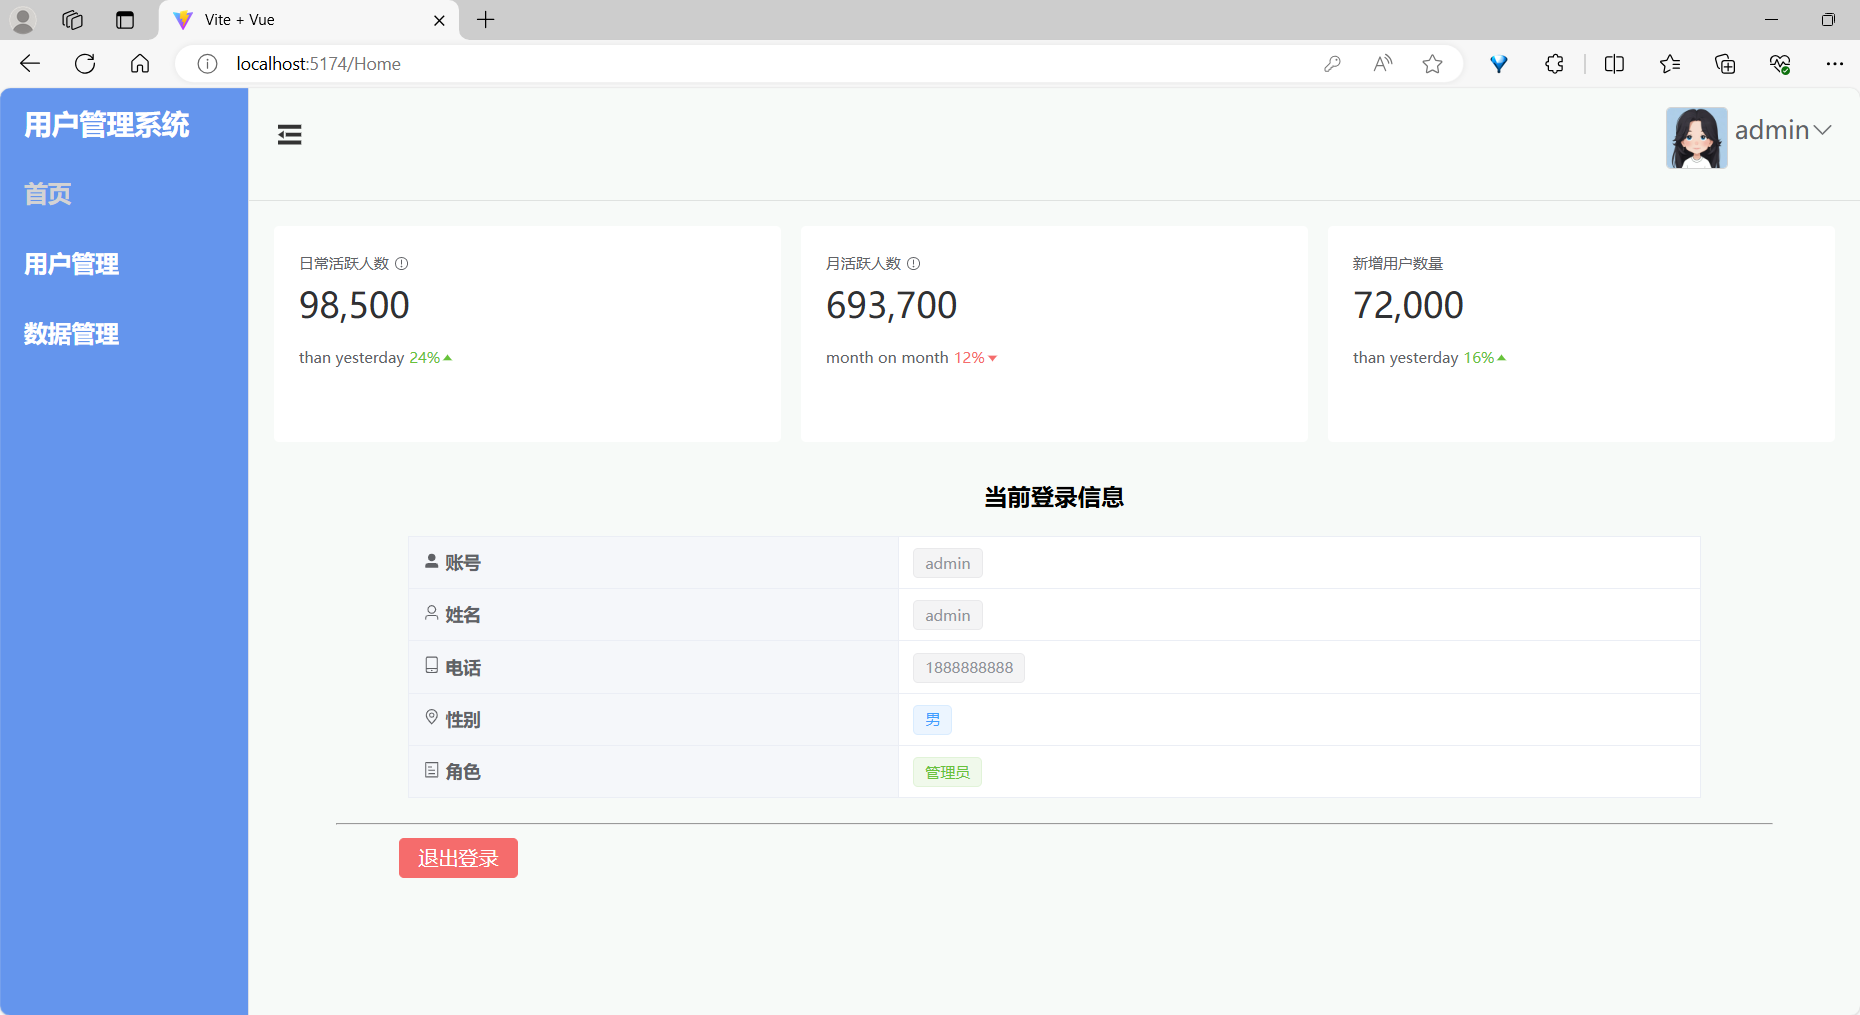
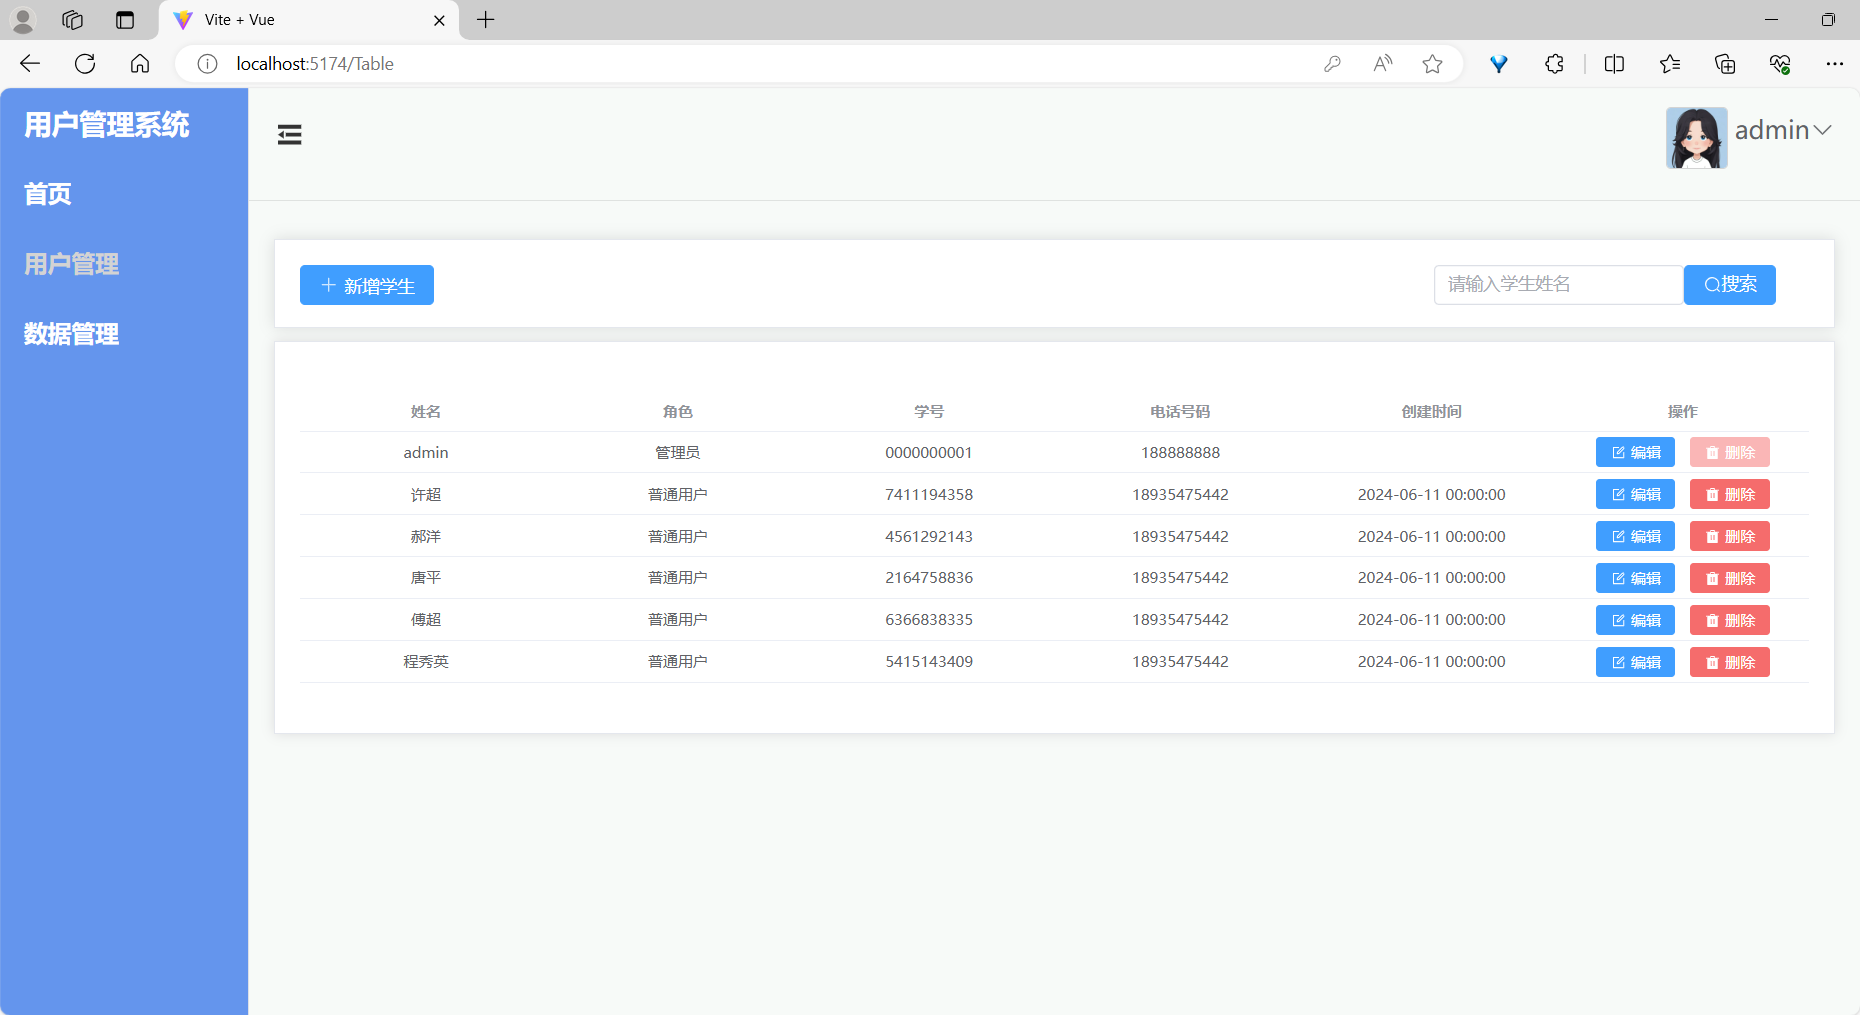
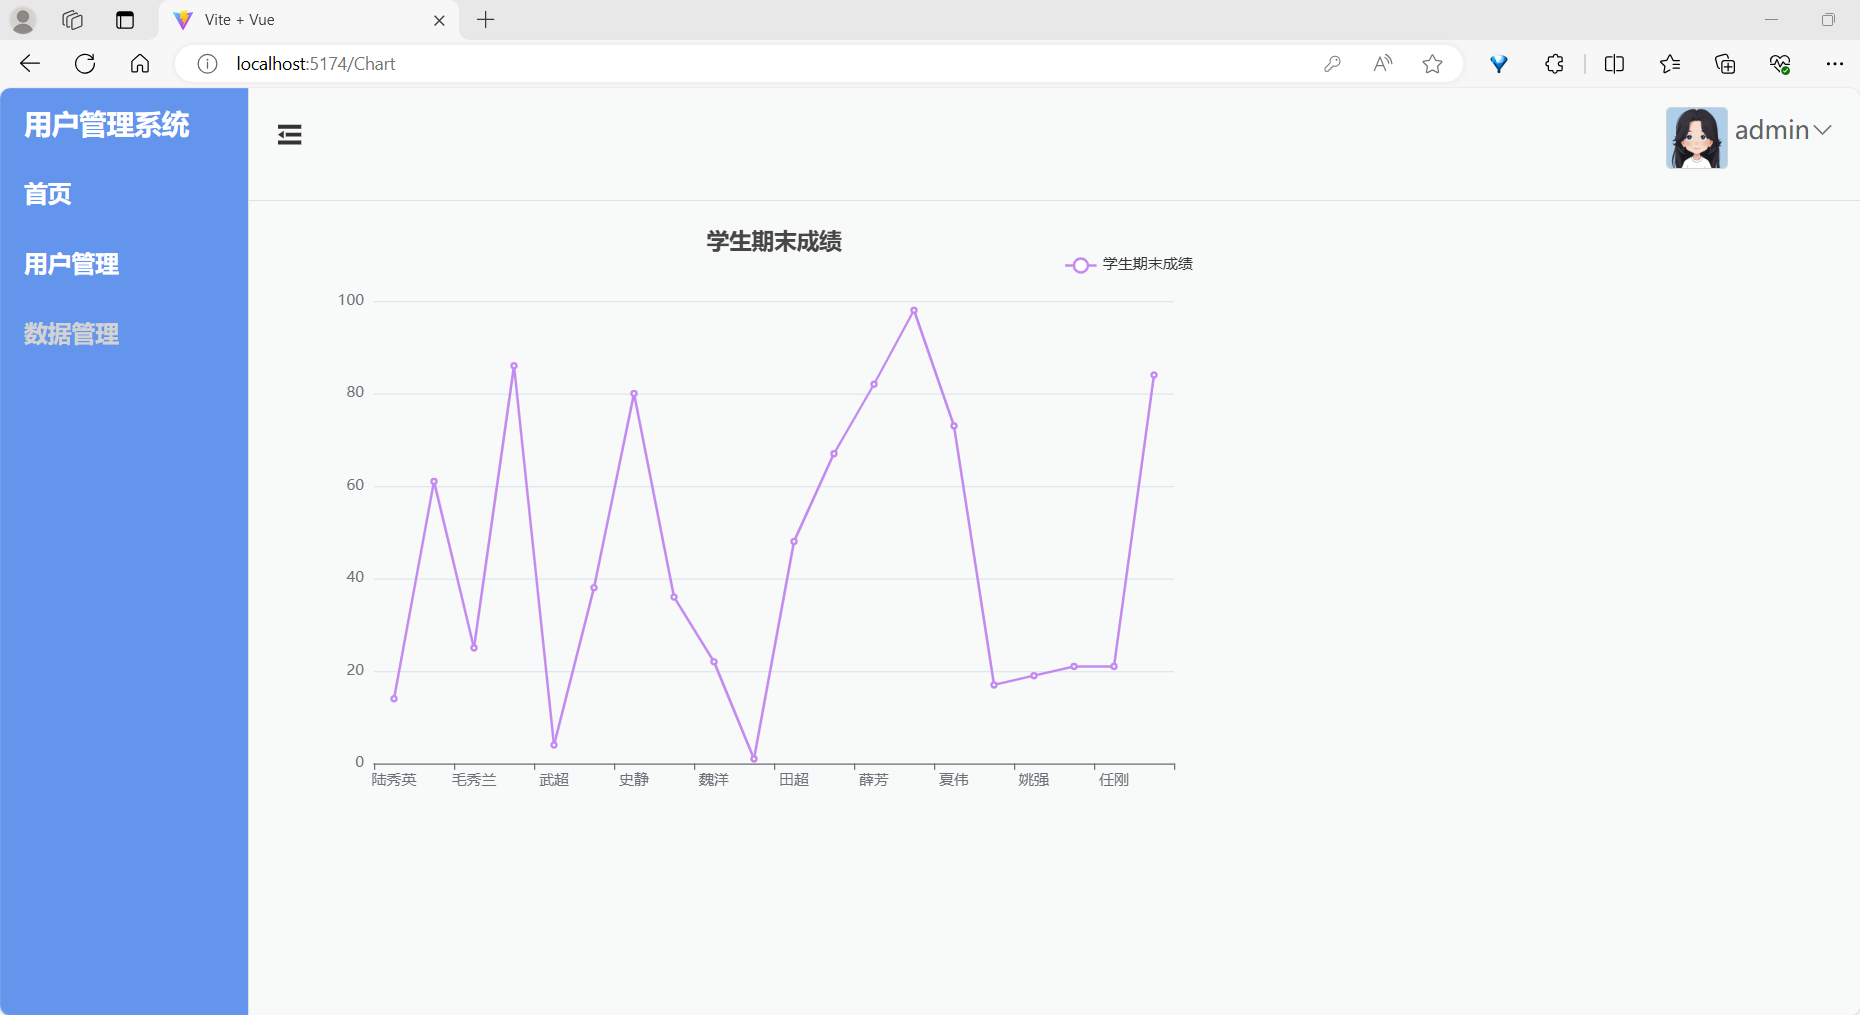
项目截图
01-首页

02-用户管理页面

03-数据管理页面

主要代码
快速搭建vue项目和elementPlus
安装vue项目开始 | Vite 官方中文文档 (vitejs.dev)
shell
# npm 6.x
npm create vite@latest my-vue-app --template vue

# npm 7+, extra double-dash is needed:
npm create vite@latest my-vue-app -- --template vue

# yarn
yarn create vite my-vue-app --template vue

# pnpm
pnpm create vite my-vue-app --template vue
安装element-plus一个 Vue 3 UI 框架 | Element Plus (element-plus.org)
shell
# element-plus选择一个你喜欢的包管理器
# NPM
$ npm install element-plus --save

# Yarn
$ yarn add element-plus

# pnpm
$ pnpm install element-plus

# element-plus的图标选择一个你喜欢的包管理器

# NPM
$ npm install @element-plus/icons-vue
# Yarn
$ yarn add @element-plus/icons-vue
# pnpm
$ pnpm install @element-plus/icons-vue
在vue项目中配置element-plus和图标
javascript
import { createApp } from 'vue'
import './style.css'
import App from './App.vue'
import ElementPlus from 'element-plus'
import 'element-plus/dist/index.css'


import * as ElementPlusIconsVue from '@element-plus/icons-vue'

const app = createApp(App)

for (const [key, component] of Object.entries(ElementPlusIconsVue)) {
  app.component(key, component)
}


app
.use(ElementPlus)
.mount('#app')
快速配置vue-router路由
安装vue-router
shell
# NPM
$ npm install vue-router --save

# Yarn
$ yarn add vue-router

# pnpm
$ pnpm install vue-router
Create a file named router/index.js and add this to it:
javascript
import {createRouter,createWebHistory} from 'vue-router'
import Login from '../components/Login.vue'
const routes=[
  {
    path: '/',
    component:Login
  }
]
const router = createRouter({
  routes,
  history: createWebHistory()
})
export default router
设置main.js
js
import { createApp } from 'vue'
import './style.css'
import App from './App.vue'
import ElementPlus from 'element-plus'
import 'element-plus/dist/index.css'
import router from './router/index'

import * as ElementPlusIconsVue from '@element-plus/icons-vue'

const app = createApp(App)

for (const [key, component] of Object.entries(ElementPlusIconsVue)) {
  app.component(key, component)
}


app
.use(router)
.use(ElementPlus)
.mount('#app')
登录代码
Create a file named components/Login.vue and add this to it:
vue
<template>
  <div class="loginBody">
    <div
      style="
          width: 98%;
          text-align: center;
          color: white;
          padding: 8vh 100px 0 0;
          -webkit-text-stroke:1px black;
          font-size: 3vh;
      "
      >
        <h1>欢迎访问用户管理系统</h1>
    </div>
    <div class="loginDiv">
      <div class="login-content">
        <h1 class="login-title">登录系统</h1>
        <el-form :model="form" ref="loginForm" :rules="rules" style="padding: 30px;">
          <el-form-item label="账号" required prop="no">
            <el-input v-model="form.no" />
          </el-form-item>
          <el-form-item label="密码" required prop="password" >
            <el-input v-model="form.password" type="password" show-password/>
          </el-form-item>
          <el-form-item>
            <div style="display: flex;justify-content: space-evenly;width: 100%;">
              <el-button type="primary" @click="submitForm(loginForm)">
                登录
              </el-button>
              <el-button @click="resetForm(loginForm)">重置</el-button>
            </div>
          </el-form-item>
        </el-form>
      </div>
    </div>
  </div>
</template>

<script setup>
  import { reactive,ref } from 'vue'
  import { ElMessage } from 'element-plus'
  import router from "@/router";

const form = reactive({
  no: '',
  password: '',
})

// 获取loginForm的实例
const loginForm = ref()

// 定义校验函数
const submitForm = async (formEl)=>{
  if (!formEl) return
  await formEl.validate((valid, fields) => {
    if (valid) {
      if(form.no==="admin"&&form.password==="123456"){
        console.log('submit!')
        sessionStorage.setItem(
          "CurUser",
          JSON.stringify(form.no)
        );
        ElMessage({
          showClose: true,
          message: "登陆成功",
          type: 'success'
        })
        router.replace("/Index");
      }else{
        ElMessage({
          showClose: true,
          message: "账号密码错误",
          type: 'error'
        })
      }
    } else {
      console.log('error submit!', fields)
    }
  })
}
// 表单校验规则(只要指定prop和添加required即可校验 但要自定义校验需要rules)
const rules = reactive({
  no: [
      { required: true, message: "请输入账号", trigger: "blur" },
  ],
  password: [
      { required: true, message: "请输密码", trigger: "blur" },
  ],
})

// 重置表单
const resetForm = (formEl) => {
  if (!formEl) return
  formEl.resetFields()
}

</script>

<style scoped>
html,
body {
    overflow-x: hidden;
}

.loginBody {
    position: absolute;
    width: 100%;
    height: 100%;
    background-color: #B3C0D1;
    background-size: 100% 100%;

    overflow-x: hidden;
}
.loginDiv {
    position: absolute;
    top: 50%;
    left: 50%;
    margin-top: -200px;
    margin-left: -250px;
    width: 450px;
    height: 330px;
    background: #fff;
    border-radius: 5%;
    opacity: 0.9;
}
.login-title {
    margin: 20px 0;
    text-align: center;
}
.login-content {
    width: 400px;
    height: 250px;
    position: absolute;
    top: 25px;
    left: 25px;
}
</style>
后台布局代码
Create a file named components/Index.vue and add this to it:
vue
<template>
  <el-container style="height: 100%; background-color:#F7FAF8;">
    <el-aside :width="aside_witdh" style="height: 100vh;background-color: rgb(238, 241, 246);margin-left: -1px;">
      <Aside :isCollapse="isCollapse"></Aside>
    </el-aside>

    <el-container style="height: 100%;">
        <el-header style="text-align: right; font-size: 12px;height: 100%;border-bottom: rgba(168,168,168,0.3) 1px solid;">
            <Header @doCollapse="doCollapse" :icon="icon"></Header>
        </el-header>

        <el-main style="height: 100%;">
            <router-view v-slot="{ Component }">
                <keep-alive>
                    <component :is="Component" />
                </keep-alive>
            </router-view>
        </el-main>
    </el-container>
  </el-container>
</template>

<script setup>
import Aside from "./Aside.vue";
import Header from "./Header.vue";
import {reactive,toRefs,onActivated} from "vue"

const data = reactive({
  isCollapse:false,
  aside_witdh:'200px',
  icon:'Fold'
})

const doCollapse = ()=>{
    data.isCollapse = !data.isCollapse
    if(!data.isCollapse){// 展开
        data.aside_witdh='200px'
        data.icon='Fold'
    }else{//关起、关闭、收起
        data.aside_witdh='64px'
        data.icon='Expand'
    }
}


const {isCollapse,aside_witdh,icon} = toRefs(data)
</script>

<style scoped>
.el-header {
    /**background-color: #B3C0D1;**/
    color: #333;
    line-height: 60px;
}

.el-aside {
    color: #333;
}
</style>
Create a file named components/Aside.vue and add this to it:
vue
<template>
  <el-menu
    background-color="#6495ED"
    text-color="white"
    active-text-color="lightgrey"
    style="height: 100%;"
    default-active="/Home"
    :collapse="isCollapse"
    :collapse-transition="false"
    router
  >
    <el-menu-item >
        <span slot="title" style="font-size: 22px;"><b>用户管理系统</b></span>
    </el-menu-item>
    <el-menu-item index="/Home" style="font-size: 19px;">
        <span slot="title"><b>首页</b></span>
    </el-menu-item>
    <el-menu-item index="/Table" style="font-size: 19px;">
        <span slot="title"><b>用户管理</b></span>
    </el-menu-item>
    <el-menu-item index="/Chart" style="font-size: 19px;">
        <span slot="title"><b>数据管理</b></span>
    </el-menu-item>
    <!--动态获取菜单-->

  </el-menu>
</template>

<script setup>


let props = defineProps({
  //导航栏菜单伸缩
  isCollapse: {
    type: Boolean,
    default: false
  }
})
console.log("props.isCollapse",props.isCollapse)


</script>

<style scoped>

</style>
Create a file named components/Header.vue and add this to it:
vue
<template>
  <div style="display: flex; line-height: 60px">
        <div style="margin-top: 15px">
            <!--菜单伸缩-->

            <el-icon style="font-size: 25px;cursor: pointer;"><component :is="icon"  @click="collapse"></component></el-icon>
        </div>
        <div style="flex: 1; text-align: center; font-size: 34px">

        </div>

        <el-row>
            <el-col :span="8">
                <el-avatar
                    shape="square"
                    :size="50"
                    :src="avatarIcon"
                    style="margin: 15px 5px -10px 0; border: 1px solid lightgrey"
                ></el-avatar>
            </el-col>
            <el-col :span="16" style="padding: 23px 0 0 0;">
                <el-dropdown >
                    <!-- dropdown下拉 -->

                        <div class="el-dropdown-link">
                            {{ user }}
                        <el-icon><ArrowDown /></el-icon>
                        </div>


                    <template #dropdown>
                        <el-dropdown-menu>
                            <el-dropdown-item @click.native="toUser"
                                >个人中心</el-dropdown-item
                            >
                            <el-dropdown-item @click.native="logout"
                                >退出登录</el-dropdown-item
                            >
                        </el-dropdown-menu>
                    </template>
                </el-dropdown>
            </el-col>
        </el-row>
    </div>
</template>

<script setup>
import router from "@/router";
import avatarIcon  from "@/assets/avatar.jpg"
import { useLogout,useUserRef } from "./hooks/useLog"
// 获取用户信息
const user = useUserRef()
const props = defineProps({
  icon: String
})

const emits = defineEmits([
"doCollapse"
])
const collapse = ()=>{
  emits("doCollapse")
}
// 跳转到个人信息路由页面
const toUser = ()=>{
    router.replace("/Index");
}
// 退出操作
const logout = useLogout
</script>

<style scoped>
.el-dropdown-link {
  cursor: pointer;
  display: flex;
  align-items: center;
  font-size: 20px;
}
</style>
Create a file named components/hooks/useLog.js and add this to it:
js
import { ElMessage, ElMessageBox } from 'element-plus'
import router from "@/router";
import { ref } from 'vue'
// 退出的hooks
export const useUserRef = ()=>{
  return ref(JSON.parse(sessionStorage.getItem("CurUser")))
}
export const useLogout = ()=>{
  console.log("logout");
  ElMessageBox.confirm(
  '是否要退出登陆?',
  'Warning',
  {
    confirmButtonText: '确定',
    cancelButtonText: '取消',
    type: 'warning',
  }
)
  .then(() => {

    sessionStorage.clear();
    router.replace("/");
    ElMessage({
      type: 'success',
      message: '退出成功',
    })
  })
  .catch(() => {
    ElMessage({
      type: 'info',
      message: '退出取消',
    })
  })
}
子路由设置
Edit a file named components/Home.vue and add this to it:
js
import {createRouter,createWebHistory} from 'vue-router'
import Login from '../components/Login.vue'
const routes=[
  {
    path: '/',
    component:Login
  },
  {
    path:'/Index',
    name:'index',
    redirect: { name: 'home' },
    component:()=>import('@/components/Index.vue'),
    children:[
      {
        path:'/Home',
        name:'home',
        meta:{
            title:'首页'
        },
        component:()=>import('@/components/Home.vue')
      },
      {
        path:'/Table',
        name:'table',
        meta:{
            title:'用户管理'
        },
        component:()=>import('@/components/UserTable.vue')
      },
      {
        path:'/Chart',
        name:'chart',
        meta:{
            title:'数据管理'
        },
        component:()=>import('@/components/UserEchart.vue')
      },
    ]
}
]
const router = createRouter({
  routes,
  history: createWebHistory()
})
export default router
首页代码
Create a file named components/Home.vue and add this to it:
vue
<template>
  <div>
    <Card></Card>
    <div
        style="
            text-align: center;
            padding: 20px 0 0 0;
            margin: 50px;
        "
    >

        <h3>当前登录信息</h3>
        <el-descriptions
            title=""
            :column="1"
            border
            style="padding: 20px 0 20px 0"
        >
        <el-descriptions-item>
            <template #label>
                <el-icon><UserFilled /></el-icon>
                            账号
            </template>
            <el-tag type="info">{{ user }}</el-tag>
         </el-descriptions-item>
         <el-descriptions-item>
            <template #label>
                <el-icon><User /></el-icon>
                姓名
            </template>
            <el-tag type="info">{{ user }}</el-tag>
         </el-descriptions-item>
         <el-descriptions-item>
            <template #label>
                <el-icon><Iphone /></el-icon>
                电话
            </template>
            <el-tag type="info">1888888888</el-tag>
         </el-descriptions-item>
         <el-descriptions-item>
            <template #label>
                <el-icon><Location /></el-icon>
                性别
            </template>
            <el-tag
                    disable-transitions
                    ><i
                        :class="'el-icon-male'"
                    ></i>男</el-tag>
         </el-descriptions-item>
         <el-descriptions-item>
            <template #label>
                <el-icon><Tickets /></el-icon>
                角色
            </template>
            <el-tag type="success" disable-transitions>管理员</el-tag>
         </el-descriptions-item>
        </el-descriptions>
        <hr />
        <el-row style="padding: 10px 50px;">
            <el-button
                type="danger"
                @click="logout"
                style=" font-size: 16px;"
                >
                <i class="element-icons el-icon-a-022"></i>
                退出登录

                </el-button
            >
        </el-row>
    </div>
  </div>

</template>

<script setup>
import { useLogout,useUserRef } from "./hooks/useLog"
import Card from "./Card.vue"
const user = useUserRef()
const logout = useLogout
</script>

<style scoped>
.el-descriptions {
    width: 90%;

    margin: 0 auto;
    text-align: center;
}
</style>
Create a file named components/Card.vue and add this to it:
vue
<template>
  <el-row :gutter="16">
    <el-col :span="8">
      <div class="statistic-card">
        <el-statistic :value="98500">
          <template #title>
            <div style="display: inline-flex; align-items: center">
             日常活跃人数
              <el-tooltip
                effect="dark"
                content="Number of users who logged into the product in one day"
                placement="top"
              >
                <el-icon style="margin-left: 4px" :size="12">
                  <Warning />
                </el-icon>
              </el-tooltip>
            </div>
          </template>
        </el-statistic>
        <div class="statistic-footer">
          <div class="footer-item">
            <span>than yesterday</span>
            <span class="green">
              24%
              <el-icon>
                <CaretTop />
              </el-icon>
            </span>
          </div>
        </div>
      </div>
    </el-col>
    <el-col :span="8">
      <div class="statistic-card">
        <el-statistic :value="693700">
          <template #title>
            <div style="display: inline-flex; align-items: center">
              月活跃人数
              <el-tooltip
                effect="dark"
                content="Number of users who logged into the product in one month"
                placement="top"
              >
                <el-icon style="margin-left: 4px" :size="12">
                  <Warning />
                </el-icon>
              </el-tooltip>
            </div>
          </template>
        </el-statistic>
        <div class="statistic-footer">
          <div class="footer-item">
            <span>month on month</span>
            <span class="red">
              12%
              <el-icon>
                <CaretBottom />
              </el-icon>
            </span>
          </div>
        </div>
      </div>
    </el-col>
    <el-col :span="8">
      <div class="statistic-card">
        <el-statistic :value="72000" title="New transactions today">
          <template #title>
            <div style="display: inline-flex; align-items: center">
             新增用户数量
            </div>
          </template>
        </el-statistic>
        <div class="statistic-footer">
          <div class="footer-item">
            <span>than yesterday</span>
            <span class="green">
              16%
              <el-icon>
                <CaretTop />
              </el-icon>
            </span>
          </div>
        </div>
      </div>
    </el-col>
  </el-row>
</template>

<script setup>
import {
  ArrowRight,
  CaretBottom,
  CaretTop,
  Warning,
} from '@element-plus/icons-vue'
</script>

<style scoped>
:global(h2#card-usage ~ .example .example-showcase) {
  background-color: var(--el-fill-color) !important;
}

.el-statistic {
  --el-statistic-content-font-size: 28px;
}

.statistic-card {
  height: 100%;
  padding: 20px;
  border-radius: 4px;
  background-color: var(--el-bg-color-overlay);
}

.statistic-footer {
  display: flex;
  justify-content: space-between;
  align-items: center;
  flex-wrap: wrap;
  font-size: 12px;
  color: var(--el-text-color-regular);
  margin-top: 16px;
}

.statistic-footer .footer-item {
  display: flex;
  justify-content: space-between;
  align-items: center;
}

.statistic-footer .footer-item span:last-child {
  display: inline-flex;
  align-items: center;
  margin-left: 4px;
}

.green {
  color: var(--el-color-success);
}
.red {
  color: var(--el-color-error);
}
</style>
用户管理代码
Create a file named components/UserTable.vue and add this to it:
vue
<template>
  <div class="view-demo">
      <el-card class="card-border-radius ma-1">
          <!-- 上方新增学生区域 -->
          <el-button
          type="primary"
          class="addbtn"
          @click="newRoleVisible=true" >
              <template #icon>
                  <Plus />
              </template>
              <template #default>新增学生</template>
          </el-button>
          <!-- 上方查询学生区域 -->
          <div class="inputArea">
              <el-input v-model="keyWords.k" placeholder="请输入学生姓名" clearable :style="{ width: '200px'}" />
              <el-button
              type="primary"
              @click="searchStudent">
                  <el-icon><Search /></el-icon>
                  搜索</el-button>
          </div>
      </el-card>
      <el-card class="card-border-radius">
          <el-table
          :style="{ margin: '20px 0px' }"
          :columns="columns"
          :data="tableData"
          :scrollbar="true"
          table-layout-fixed
          size="small"
          max-height="80%"
          :pagination="{pageSize:10}">
              <el-table-column
                  label="姓名"
                      prop="roleName"
                      align="center">
                  </el-table-column>
                  <el-table-column
                  label="角色"
                  prop="roleLevel"
                      align="center">
              </el-table-column>
                  <el-table-column
                  label="学号"
                  prop="roleNum"
                      align="center">
                  </el-table-column>
                  <el-table-column
                  label="电话号码"
                  prop="rolePhone"
                      align="center">
              </el-table-column>
              <el-table-column
                  label="创建时间"
                  prop="createTime"
                      align="center">
              </el-table-column>
              <el-table-column
                  label="操作"
                  align="center"
                  >
                  <template #default="scope">
                      <el-button
                      size="small"
                      type="primary"
                      @click="updateStudent(scope.row)"
                      >
                      <template #icon><el-icon><Edit /></el-icon></template>
                      编辑
                  </el-button>
                  <el-button
                      size="small"
                      type="danger"
                      @click="delRole(scope.row)"
                      :disabled="scope.row.id=='0'"
                      >
                      <template #icon><el-icon><DeleteFilled /></el-icon></template>
                      删除
                  </el-button>
                  </template>
              </el-table-column>
          </el-table>
      </el-card>
      <!-- 新增学生信息弹框 -->
      <el-dialog
              v-model="newRoleVisible"
              title="新增学生信息"
              :style="{width:'450px'}"
              align-center
              @close="clearForm">
      <el-form :model="form" class="form">
          <el-form-item label="学生姓名" :label-width="formLabelWidth">
              <el-input
              v-model="form.roleName"
              :style="{ width: '300px'}"
              placeholder="请输入学生姓名"
              ></el-input>
          </el-form-item>
          <el-form-item label="学生学号" :label-width="formLabelWidth">
              <el-input
              v-model.number="form.roleNum"
              :style="{ width: '300px'}"
              placeholder="学号不超过11位"
              ></el-input>
          </el-form-item>
          <el-form-item label="学生电话" :label-width="formLabelWidth">
              <el-input
              v-model.number="form.rolePhone"
              :style="{ width: '300px'}"
              placeholder="请输入学生电话号码"
              ></el-input>
          </el-form-item>
          <el-form-item label="密码" :label-width="formLabelWidth">
              <el-input
              v-model.number="form.rolePassword"
              :style="{ width: '300px'}"
              placeholder="请输入账号密码"
              ></el-input>
          </el-form-item>
          <el-form-item label="角色" :label-width="formLabelWidth">
              <el-input
              v-model.number="form.roleLevel"
              :style="{ width: '300px'}"
              placeholder="请输入账号角色"
              ></el-input>
          </el-form-item>
      </el-form>
      <template #footer>
          <span class="dialog-footer">
              <el-button type="primary" @click="addRole">提交</el-button>
              <el-button @click="newRoleVisible = false">取消</el-button>
          </span>
      </template>
      </el-dialog>
      <!-- 修改学生信息弹框 -->
      <el-dialog
              v-model="updateRoleVisible"
              title="修改学生信息"
              :style="{width:'450px'}"
              align-center
              @close="clearForm1">
      <el-form :model="updateform" class="form">
          <el-form-item label="学生姓名" :label-width="formLabelWidth">
              <el-input
              v-model="updateform.roleName"
              :style="{ width: '300px'}"
              placeholder="请输入学生姓名"
              ></el-input>
          </el-form-item>
          <el-form-item label="学生学号" :label-width="formLabelWidth">
              <el-input
              v-model.number="updateform.roleNum"
              :style="{ width: '300px'}"
              placeholder="学号不超过11位"
              ></el-input>
          </el-form-item>
          <el-form-item label="学生电话" :label-width="formLabelWidth">
              <el-input
              v-model.number="updateform.rolePhone"
              :style="{ width: '300px'}"
              placeholder="请输入学生电话号码"
              ></el-input>
          </el-form-item>
          <el-form-item label="密码" :label-width="formLabelWidth">
              <el-input
              v-model.number="updateform.rolePassword"
              :style="{ width: '300px'}"
              placeholder="请输入账号密码"
              ></el-input>
          </el-form-item>
          <el-form-item label="角色" :label-width="formLabelWidth">
              <el-input
              v-model.number="updateform.roleLevel"
              :style="{ width: '300px'}"
              placeholder="请输入账号角色"
              ></el-input>
          </el-form-item>
      </el-form>
      <template #footer>
          <span class="dialog-footer">
              <el-button type="primary" @click="updateRole">提交</el-button>
              <el-button @click="updateRoleVisible = false">取消</el-button>
          </span>
      </template>
      </el-dialog>
  </div>
</template>

<script setup>
import axios from "axios";
import dayjs from 'dayjs'
import { onBeforeMount, onMounted, reactive, ref } from "vue";


const columns = [
  {
      title: "姓名",
      dataIndex: "roleName",
  },
  {
      title: "学号",
      dataIndex: "roleNum",
  },
  {
      title: "电话号码",
      dataIndex: "rolePhone",
  },
  {
      title: "角色",
      dataIndex: "roleLevel",
  },
  {
      title: "注册时间",
      dataIndex: "createTime",
  }
]
//学生信息数据
const tableData = ref([]);
// 空的中间变量数组
const itemData = ref([]);
//新增学生信息弹框
var newRoleVisible = ref(false)
// 修改学生信息弹框
var updateRoleVisible = ref(false)
// 修改学生的id
var stuid = 0
//label最大长度,作用是对齐
const formLabelWidth = '100px'
//新增学生信息弹框里的表单
const form = reactive({
  id:6,
  roleName: "",
  roleNum: "",
  rolePhone: "",
  roleLevel: ""
})
// 修改学生信息弹框里的表单
const updateform = reactive({
  id:0,
  roleName: "",
  roleNum: "",
  rolePhone: "",
  roleLevel: ""
})
// 搜索的关键词
const keyWords = reactive({
  k:""
})
//获取学生信息--发送axios请求
const getData = () => {
  axios.get('/data/index').then((res) => {
      console.log(res.data.data)
      tableData.value = [{
        "id":0,
        "roleName":"admin",
        "roleNum":"0000000001",
        "rolePhone":"188888888",
        "roleLevel":"管理员"
      },...res.data.data]

  })
}
// 新增学生信息
const addRole = () => {
  // id自增
  form.id++
  form.createTime = dayjs(new Date()).format('YYYY-MM-DD HH:mm:ss')
  // 一个对象
  const item = JSON.parse(JSON.stringify(form))
  console.log(item)
  const res = axios.post('/add',{data: item})
  tableData.value.push(item)
  console.log(res)
  // 关闭弹框
  newRoleVisible.value = false
}
// 删除学生信息
const delRole = (row) => {
  // 获取改行的ids
  const id = row.id
  console.log(id)
  // 在本地存储的数据进行删除
  tableData.value = tableData.value.filter((item) => {
      return item.id != id
  })
  console.log(tableData.value)
}
// 搜索学生信息
const searchStudent = () => {
  itemData.value = tableData.value.filter((p) => {
          return p.roleName.indexOf(keyWords.k) !== -1
      })
      console.log(itemData.value)
      // 深拷贝,将搜索的来的东西转为数组
      const item = JSON.parse(JSON.stringify(itemData.value))
      console.log(item)
      tableData.value = item
}
// 修改学生信息弹框出现
const updateStudent = (row) => {
  // 弹框出现
  updateRoleVisible.value = true
  console.log(row)
  // 将该学生的id记住
  stuid = row.id
}
//修改学生信息
const updateRole = () =>{
  // 将该学生的id给新的表单id
  updateform.id = stuid
  updateform.createTime = dayjs(new Date()).format('YYYY-MM-DD HH:mm:ss')
  // 将输入的更新学生的信息转化为对象
  const item1 =  JSON.parse(JSON.stringify(updateform))
  console.log(item1)
  // 找到该学生的下标
  var index = tableData.value.findIndex((item) => {
      return item.id === item1.id
  })
  // 删除,再插入
  tableData.value.splice(index,1,item1)
  // 清空输入的内容
  clearForm1()
  // 关闭修改信息的弹框
  updateRoleVisible.value = false
}
// 关闭新增学生弹框时清空form信息
const clearForm = () => {
  form.roleName = ''
  form.roleNum = ''
  form.rolePhone = ''
}
// 关闭修改学生弹框时清空form信息
const clearForm1 = () => {
  updateform.roleName = ''
  updateform.roleNum = ''
  updateform.rolePhone = ''
}
// 页面挂载之前获取学生信息
onBeforeMount(() => {
  getData();
})


</script>

<style scoped>
.addbtn{
display: flex;
flex-direction: row;
float: left;
display: inline-block;
justify-content: space-around;
}
.inputArea{
  display: flex;
  display: inline-block;
  float: right;
  width: 300px;
  margin-bottom: 18px;
}

.view-demo{
  height: 100%;
  padding: 10px;
}
.ma-1{
  margin: 10px 0;
  border-radius: 10px;
}
.form{
  margin: auto;
  margin: 0 auto;
}
/* 所有卡片的配置 */
.card-border-radius {
border-radius: var(--border-radius-large) !important;
}
.card-border-radius:hover{
box-shadow: 0px 0px 10px #ddd;
}
</style>
数据管理代码
Create a file named components/UserEchart.vue and add this to it:
vue
<template>
  <div ref="barChart" :style="{ width: '800px', height: '800px',margin:auto }"></div>
      <!-- <div ref="pieChart" :style="{width:'500px',height:'300px'}"></div> -->
</template>

<script setup>
import axios from "axios";
import * as echarts from 'echarts';
import { onMounted, ref, reactive, onBeforeMount } from 'vue';


// 存学生的数据
const stuData = ref([]);
 var item = ref([])
// 获取学生期末信息
const getScore = () =>{
  axios.get('/getScore').then((res) =>{
    stuData.value = JSON.parse(JSON.stringify(res.data.data))

  })
}
item = JSON.parse(JSON.stringify(stuData.value))
const barChart = ref();
const myChart1 = ref();
// 绘制柱形图

const initBarEcharts = () => {
axios.get('/getScore').then((res) =>{
    stuData.value = JSON.parse(JSON.stringify(res.data.data))
    myChart1.value = echarts.init(barChart.value);
  myChart1.value.setOption({
      title: {
          text: '学生期末成绩',
          x: 'center'
      },
      tooltip: {
          trigger: 'item'
      },
      legend: {
          data: ['学生期末成绩'],
          orient: 'vertical',
          right: 60,
          top: 20
      },
      xAxis: {
        type:'category',
        data: stuData.value.map(d => d.name)
      },
      yAxis: {
        type:'value'
      },
      color: ['#c38bef'],
      series: [
          {
              name: '学生期末成绩',
              type: 'line',
              data: stuData.value.map(d => d.fscore)
          },
      ]
  });
  console.log(stuData.value)

  })

}

onBeforeMount(() =>{
getScore();
})
onMounted(() => {
  initBarEcharts();
});

</script>

<style scoped>
.view-demo{
  height: 100%;
  padding: 10px;
}
#chart {
width: auto;
height: 500px;
}
/* 所有卡片的配置 */
.card-border-radius {
border-radius: var(--border-radius-large) !important;
}
.card-border-radius:hover{
box-shadow: 0px 0px 10px #ddd;
}
</style>
极速大抄(获取源码)
直接拿项目源码
请关注微信公众号 技术成神
添加阿飞(微信号:jscsvip)
提供源码与技术支持,保证服务满意
项目修复问题
2024/6/14 fix: 搜索数据丢失问题
 技术成神
技术成神